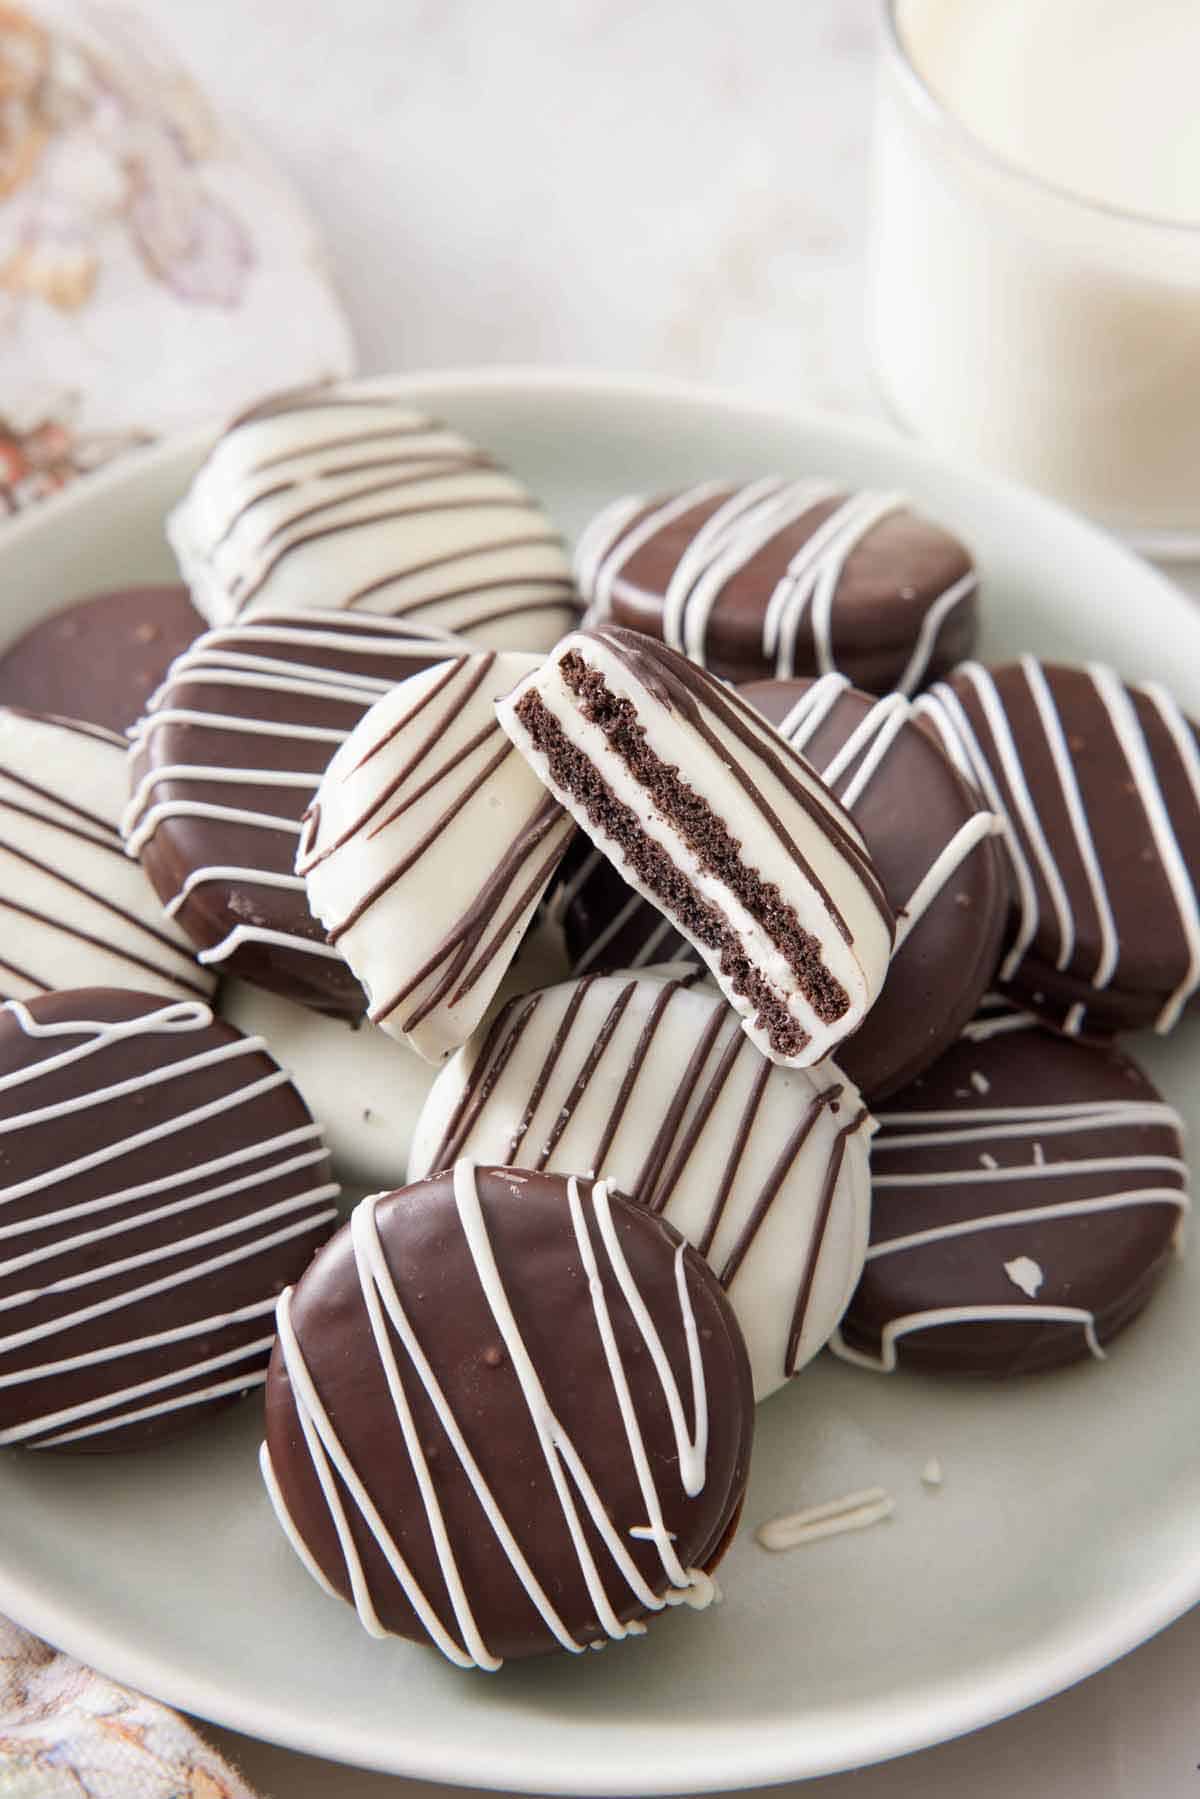
Welcome to my journey through the delightful world of chocolate covered Oreos! In this guide, I'll share how to make chocolate covered Oreos that are not just snacks but heavenly treats. They can elevate any occasion. From the classic cookie to the magical touch of Oreos with white chocolate covering, you'll find everything you need to create these indulgent, rich confections.
Whether you're preparing for a celebration or simply craving something sweet, I promise that these recipes will charm your taste buds. Let's dive in!
Introduction to Chocolate Covered Oreos
Chocolate covered Oreos are a sweet treat many love. They mix the crunch of Oreos with the richness of chocolate. In this introduction, I'll explain why they're so special and why people can't get enough of them.
The first bite of a chocolate covered Oreo is always a joy. The cookie's crunch and the chocolate's creaminess are a perfect match. This mix makes every bite a treat, whether at a party or just for fun.
Oreos have a rich history that makes them even more special. Nabisco introduced them in 1912. Over time, they've grown from a simple cookie to many flavors and treats. Chocolate covered Oreos show how Oreos keep surprising and delighting fans with new twists.
Discover more delightful Greek desserts and explore endless sweet inspirations.
Choosing the Right Oreos for Your Recipe
Choosing the right Oreos is key when making chocolate-covered treats. I've found that classic and flavored Oreos can make a big difference. Classic Oreos have a familiar crunch and rich chocolate taste. Flavored Oreos, like mint and peanut butter, add a fun twist.
- Classic vs. Flavored Oreos: Classic Oreos are a timeless choice with their dark chocolate wafers and creme filling. They're perfect for any chocolate-covered recipe. Flavored Oreos, like mint and peanut butter, bring new tastes. Birthday cake Oreos add a festive touch, great for celebrations.
- Finding Gluten-Free Options: For those with gluten sensitivities, finding gluten-free Oreos is important. Oreo now offers gluten-free options, so everyone can enjoy chocolate-covered treats. Always check labels for gluten-free tags to be sure. This way, everyone can indulge in these tasty treats.
How to Make Chocolate Covered Oreos
Ingredients
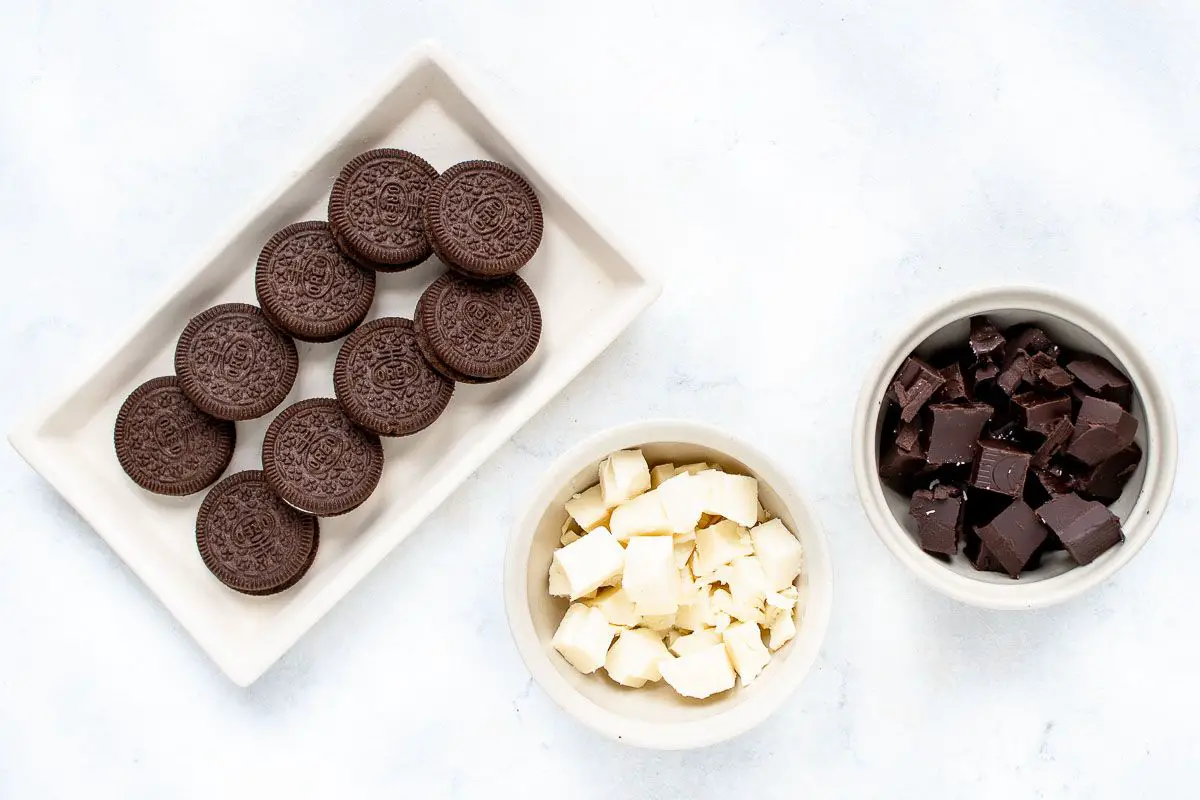
- Oreos: Classic or your favorite flavored variety (mint, peanut butter, etc.)
- Chocolate: Dark, milk, or white chocolate
- Vegetable Oil or Coconut Oil (optional): For a smoother chocolate coating
Toppings (Optional):
- Sprinkles
- Crushed nuts
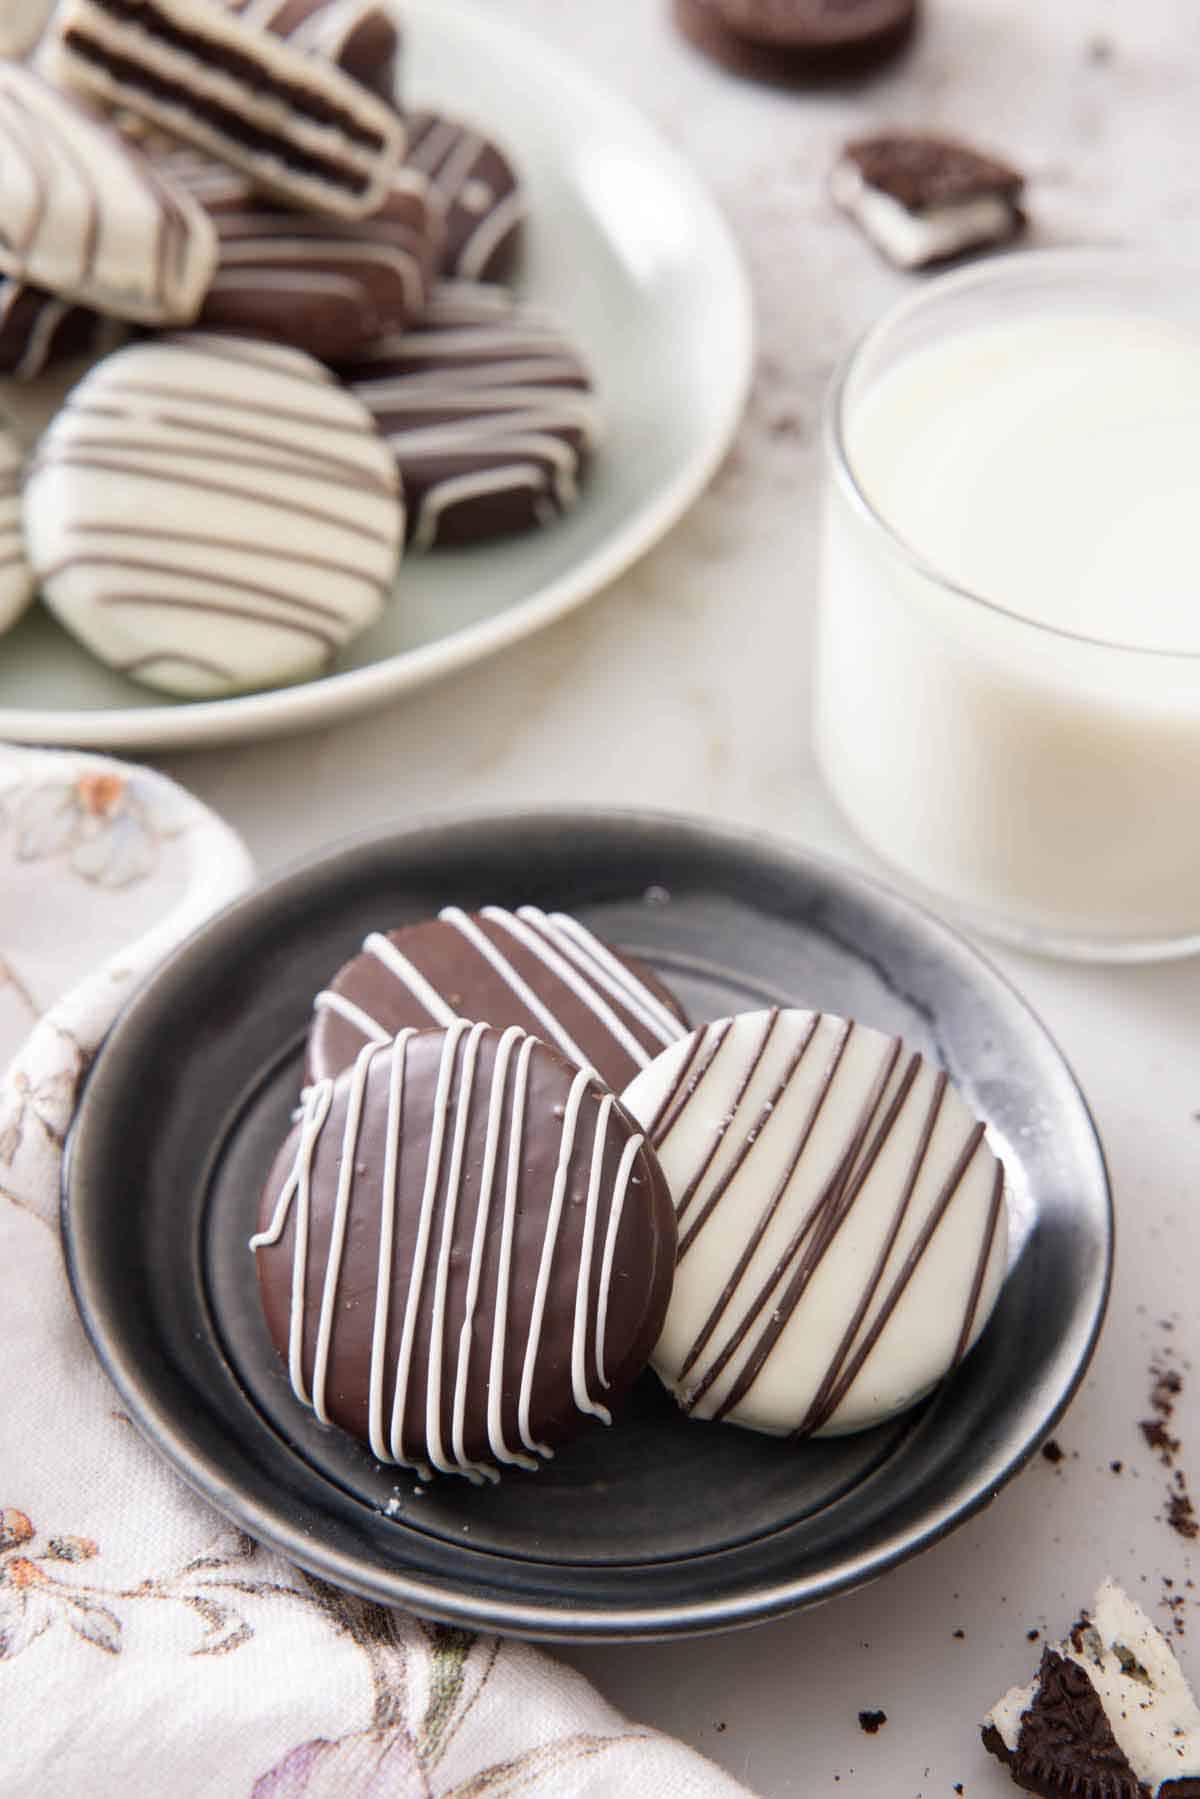
- Drizzled melted white or dark chocolate
Tools and Equipment
- Microwave-Safe Bowl: For melting chocolate
- Fork or Dipping Tool: To coat the Oreos
- Parchment Paper or Cooling Rack: For drying
- Microwave or Double Boiler: For melting chocolate
Step-by-Step Instructions
- Prepare Ingredients: Gather Oreos, chocolate, and toppings.
- Melt Chocolate: Place chocolate in a microwave-safe bowl. Heat in 30-second intervals, stirring after each, until smooth. If using a double boiler, melt chocolate over low heat.
- Coat Oreos: Use a fork or dipping tool to submerge an Oreo into the melted chocolate. Lift and tap gently to remove excess chocolate.
- Add Toppings: Place the coated Oreo on parchment paper. Sprinkle your desired toppings before the chocolate hardens.
- Dry and Set: Let the Oreos sit at room temperature or refrigerate until the chocolate is firm.
- Serve and Enjoy: Arrange beautifully and serve to your delighted guests!
Nutrition Facts (Per Serving)
- Calories: 120
- Sugar: 9g
- Sodium: 60mg
- Fat: 5g
- Saturated Fat: 3g
- Unsaturated Fat: 2g
- Trans Fat: 0g
- Carbohydrates: 16g
- Fiber: 1g
- Protein: 1g
- Cholesterol: 2mg
Notes
- Use gluten-free Oreos for a gluten-free version.
- Store in an airtight container at room temperature for up to 2 weeks.
- Refrigeration extends shelf life but may dull the chocolate’s shine.
- Get creative with toppings to suit different occasions!
Exploring Variations of White Chocolate Covered Oreos
Exploring white chocolate covered Oreos opens a world of flavors and creativity. I love trying new ways to make my treats stand out. Let's look at some exciting variations.
Flavoring Your White Chocolate
Customizing the flavor of white chocolate is the best part. Here are some ideas to get you started:
- Add a teaspoon of vanilla extract for a classic touch.
- Incorporate flavored oils, such as peppermint or almond, for a unique twist.
- Mix in citrus zest like orange or lemon for a refreshing burst of flavor.
These techniques can make your dessert truly special. They bring out the creamy richness of the white chocolate and the chocolaty crunch of the Oreos.
Decorating With Sprinkles and Nuts
Oreo decorations make these cookies look great. Here are some ideas for decorating:
- Top with colorful sprinkles for a festive look.
- Sprinkle crushed nuts like almonds or peanuts for added texture.
- Use edible glitter for a glamorous touch that wows guests.
Each decoration adds a personal touch, perfect for birthdays, holidays, or any special occasion. I enjoy mixing different toppings to create an eye-catching assortment that everyone will love.
Serving Suggestions for Your Chocolate Covered Oreos
When serving chocolate covered Oreos, how you present them matters a lot. I enjoy finding creative ways to make this treat even better. Pairing them with the right drinks can make any event memorable. Here are some of my favorite drink pairings and presentation ideas for serving chocolate covered Oreos.
Best Pairings with Beverages
Choosing the right drinks can make chocolate covered Oreos even more delicious. Here are some of my top picks for Oreo drink pairings:
- Coffee: A rich, dark roast coffee complements the sweetness of the Oreos.
- Milk: Classic cold milk is the ultimate match for the creamy filling.
- Dessert wines: Try pairing with a sweet dessert wine, like Port or Moscato, for an indulgent experience.
- Cocktails: Consider a chocolate martini to elevate the dessert experience at your gathering.
Creative Presentation Ideas for Gatherings
Creating a stunning visual impact while serving chocolate covered Oreos is just as fun as tasting them. Here are some creative presentation ideas to consider:
- Use decorative platters to arrange the Oreos in a beautiful display.
- Incorporate them into dessert tables alongside other sweet treats for an impressive spread.
- Personalize gift packaging for special occasions, adding a thoughtful touch.
- Serve them on tiered stands for a sophisticated look at parties or events.
By trying out these ideas, you can make serving chocolate covered Oreos a highlight of any gathering. It's sure to leave guests eager for more!
When making your own chocolate covered Oreos, try different flavors and decorations. There are endless possibilities, and each one can be a new adventure. Let your creativity run wild and make these treats your own.
So, get your ingredients ready and start making chocolate covered Oreos. These treats are more than just a snack; they're an experience. Enjoy the amazing flavors and textures, and don't forget to share them with others. Sharing delicious treats with loved ones is even more special!
Don’t forget to visit So Damn Delish for more recipes and ideas.
FAQs
Q: What type of chocolate should I use for chocolate covered Oreos?
A: You can choose from dark, milk, or white chocolate. Each one gives Oreos a unique taste. White chocolate Oreos are especially delightful.
Q: How do I prevent the chocolate from seizing when melting?
A: To avoid chocolate seizing, melt it slowly over low heat. Or use short microwave bursts, stirring often. Adding a bit of vegetable oil helps keep it smooth.
Q: Can I use flavored Oreos for my chocolate covered Oreos recipe?
A: Yes! Flavored Oreos like mint or birthday cake make chocolate covered Oreos even better. Try different flavors for a fun twist.
Q: How long will my chocolate covered Oreos last?
A: Store them in an airtight container at room temperature for 1-2 weeks. Refrigeration can extend this, but the chocolate might lose its shine.
Q: Are chocolate covered Oreos gluten-free?
A: Regular Oreos are often gluten-free, but always check the packaging. For certainty, use gluten-free Oreos for your treats.
Q: What are some creative decorations for my chocolate covered Oreos?
A: Decorate with sprinkles, crushed nuts, or extra chocolate for a gourmet look. It adds a special touch to your Oreos.
Q: Can I use other types of coatings besides chocolate for my Oreos?
A: Yes! Try white chocolate, candy melts, or yogurt for different tastes and textures. It's a fun way to mix things up.
Print
Heavenly Chocolate Covered Oreos Guide
Indulge in So Damn Delish’s guide to creating divine chocolate covered Oreos that'll delight your taste buds and impress guests at any gathering. Explore now!
Ingredients
- Oreos: Classic or your favorite flavored variety (mint, peanut butter, etc.)
- Chocolate: Dark, milk, or white chocolate
- Vegetable Oil or Coconut Oil (optional): For a smoother chocolate coating
Toppings (Optional):
- Sprinkles
- Crushed nuts
- Drizzled melted white or dark chocolate
Tools and Equipment
- Microwave-Safe Bowl: For melting chocolate
- Fork or Dipping Tool: To coat the Oreos
- Parchment Paper or Cooling Rack: For drying
Microwave or Double Boiler: For melting chocolate
Instructions
- Prepare Ingredients: Gather Oreos, chocolate, and toppings.
- Melt Chocolate: Place chocolate in a microwave-safe bowl. Heat in 30-second intervals, stirring after each, until smooth. If using a double boiler, melt chocolate over low heat.
- Coat Oreos: Use a fork or dipping tool to submerge an Oreo into the melted chocolate. Lift and tap gently to remove excess chocolate.
- Add Toppings: Place the coated Oreo on parchment paper. Sprinkle your desired toppings before the chocolate hardens.
- Dry and Set: Let the Oreos sit at room temperature or refrigerate until the chocolate is firm.
- Serve and Enjoy: Arrange beautifully and serve to your delighted guests!
Notes
- Use gluten-free Oreos for a gluten-free version.
- Store in an airtight container at room temperature for up to 2 weeks.
- Refrigeration extends shelf life but may dull the chocolate’s shine.
- Get creative with toppings to suit different occasions!
- Category: Desserts, Drinks, & Such
Nutrition
- Calories: 120
- Sugar: 9g
- Sodium: 60mg
- Fat: 5g
- Saturated Fat: 3g
- Unsaturated Fat: 2g
- Trans Fat: 0g
- Carbohydrates: 16g
- Fiber: 1g
- Protein: 1g
- Cholesterol: 2mg